Social Icons

twitterfacebookgoogle pluslinkedinrss feedemail

Pages

Featured Posts

This is default featured slide 1 title

Easy to customize it, from your blogger dashboard, not needed to know the codes etc. Video tutorial is available, also a support forum which will help to install template correctly. By DeluxeTemplates.net

This is default featured slide 2 title

Easy to customize it, from your blogger dashboard, not needed to know the codes etc. Video tutorial is available, also a support forum which will help to install template correctly. By DeluxeTemplates.net

This is default featured slide 3 title

Easy to customize it, from your blogger dashboard, not needed to know the codes etc. Video tutorial is available, also a support forum which will help to install template correctly. By DeluxeTemplates.net

This is default featured slide 4 title

Easy to customize it, from your blogger dashboard, not needed to know the codes etc. Video tutorial is available, also a support forum which will help to install template correctly. By DeluxeTemplates.net

This is default featured slide 5 title

Easy to customize it, from your blogger dashboard, not needed to know the codes etc. Video tutorial is available, also a support forum which will help to install template correctly. By DeluxeTemplates.net

Monday, February 6, 2012

Introducing The One Stop Button Shop


Who is The One Stop Button Shop?

    The One Stop Button Shop is part of a larger business called Faville Photo Giclee Printing. Faville Photo is a Fine Art Print Shop located in Mesa, Arizona that is run solely by husband and wife, John and Jessica Gilman.


What makes us different?

    Faville Photo also specializes in reproducing and printing artwork for artists and photographers, which means we use only the highest quality materials for our clients.
    For all of our button products, we use the Epson Premium Luster Photo Paper, which is the best photo paper available on the market today. Not only that, but it is 100% archival, meaning it will last over 100 years in normal conditions without yellowing or fading.
    We also use a top-of-the-line giclee printer - The Canon IPF 8100. This high quality inkjet printer has 12 colors, as opposed to a standard printer, which has 4 colors, and it is also 44 inches wide!
    So there you have it! Archival papers, archival inks, a top-of-the-line giclee printer, and the attention-to-detail of print shop owners who love their job and take great pride in their work. That is the recipe for the absolute HIGHEST quality giclee prints available on the market, and therefor the highest quality pinback buttons, pocket mirrors, magnets, and Christmas ornaments!


How are the Christmas ornaments, pinback buttons, pocket mirrors, and magnets made?
     Each item is made slightly different than the other, but in general, they all use the same technique.

1. First, the graphics are created in Photoshop for every individual order, with your personalized information and photos.

2. The graphics are printed out on our high quality 44" Giclee Printer, pictured above.

3. Each item is made up of many different pieces, all of which are assembled and then pressed together using the button press below. In general, they all include a back, the special part(s) that makes it what it is (mirror, magnet, etc), and a sheet of protective mylar, or plastic. 


The Christmas ornaments are a little more involved due to the fact that the button machine is not designed to create something with a ribbon pressed in between the parts. But, since we are the only place that offers this type of Christmas ornament, we keep the process a secret. :)


How do I take care of my Christmas ornament (or pinback button, mirror, or magnet) to ensure that it lasts a long time?

    The One Stop Button Shop wants to make sure that your memories last a lifetime, therefor we only use the highest quality materials, including our 100% archival photo paper for every order.
    Every Christmas ornament and mirror comes with a soft satin bag to keep the item from contact with dust and dirt, and keeps the item scratch free and in optimum condition. The satin bags can also be purchased for pinback buttons and magnets for an additional fee. Keep your item in a bag when it is not in use.
    To maximize the life of the ornament and other button products, keep the item away from humid, damp, or wet places and out of direct sunlight for a long period of time. Meaning, don't display your item in direct sunlight, or store your ornament in the garage or attic where it tends to be more humid than the rest of the house.

To go back to The One Stop Button Shop on Etsy, Click Here.

Thursday, August 11, 2011

Keep Posted!

Hello,

Just wanted to mention that we are planning on updating and completely redesiging this blog on a regular basis with the debut of our new website in a month or two, so please stay tuned! To stay informed on this blog, our Etsy stores, discount offers, and special sales, please follow us on any of the social networking sites below:

Facebook:
Photography - http://www.facebook.com/pages/Faville-Photo-Photography/142716025811395
Giclee Printing - http://www.facebook.com/pages/Faville-Photo/148265471676

Tumblr:
http://www.everythingartisticblog.com/

Twitter:
http://twitter.com/#!/FavillePhoto


Thank you for checking out this blog, and please check back soon!

Tuesday, February 1, 2011

Great Valentine's Day Gift Idea


Valentine's Day is not only always about the gift, it is about taking the time on this one special day of the year to go above and beyond to show your loved one just how much you care. Whether it's your first Valentine's Day or your 30th, surprising your loved one with a thoughtful and romantic gift never fails. And we know how tough it is to come up with that amazing gift, that is why Faville Photo is offering a special Valentine's Day designs for the holiday!

Take that heartwarming photo of the two of you and have it personalized on canvas! Add the lyrics to "your song", add a meaningful quote, or write a letter to show how much you care. We can add any custom text to a photo, make a collage, or even create a custom design. The possibilities are endless. Use your love this holiday to fuel your creativity and get your loved one something meaningful this Valentine's Day!

Below are a just few examples of what we have to offer. You can use any of these designs or have your very own custom design created. Have your photo or design printed on professional gallery wrapped canvas or elegantly matted and framed! If you would like to move forward with this project, please contact Faville Photo at FavillePhoto@gmail.com or (623) 204-7516.

If you would like to see samples printed on canvas, please call to make an appointment!

(Click on the images to view a large size.)


Fountain Hills Great Fair


It's that time of year again! One of the biggest art festivals in the state of Arizona is coming up this February 25 - 27! For 23 years, Fountain Hills has been putting on this three day art festival with nearly 500 artists from across the United States and around the world, and attracts more than 200,000 visitors each year. If you haven't been there yet, it is a must see event! Trust me, you won't want to miss it!

Free Admission, Free Parking, Plenty of Food and Bathrooms, Hours are 10am to 5pm

For more information, click here.


Another popular event is the annual Hot Air Balloon Rally, held at 7:00 a.m. on Sunday, February 27th. There are great photo opportunities of balloons reflecting against the water with the fountain in the background. Unlike most balloon races, this rally features a unique tradition among the balloonists. Following the launch many pilots attempt a dip of their baskets into Fountain Lake. The rally generally attracts 30 to 40 balloonists.

Thursday, January 20, 2011

How to Calibrate Your Monitor

One of the most common questions asked by our clients is - "These prints don't look exactly like they do on my monitor, why is that?"

The reason for that is that every single monitor is different from computer to computer. So, the way the image looks on your monitor has no bearing what-so-ever on how the final image will turn out. Only when a monitor is calibrated correctly will the monitor reflect exactly what the image will look like after it's printed. The paper also does play a part. The ultrasmooth paper, along with a couple of our other fine art papers will tend to darken the image just a little bit. But it's nothing that can't be fixed with a little Photoshop. This is the main reason that we always suggest getting a proof print done. At Faville Photo, we offer 6"x8" proofs at $4 each, so it might be cost effective to pay the extra $4 to make sure you get exactly what you're looking for. And usually if you place a large order, we will waive the cost of the proofs anyway.

"In order to see images the way they were intended to be seen, your monitor might need to be calibrated. If you're a web designer, digital photographer, or graphic designer, this is especially important. You don't want to spend hours choosing the perfect subtle color scheme only to see a mis-matched mess on someone else's monitor or coming out of a printer. Here's how to calibrate your monitor so that what you see is what you get.

1. Check the screen resolution. Choose the highest resolution available unless the text is too small. If you are using an LCD monitor, check the manual or box for the "native" resolution. Set your computer to this resolution.

2. Verify that your computer monitor is in high color or 24-bit mode. In Windows, check this by right clicking on your desktop and choosing Graphic Properties. On Mac, go to Preferences, then click on Displays and then choose Colors:Millions. If your display is in 16-bit color, there won't be enough color depth for the calibration process.

3. Let your monitor warm up for at least 15 (preferably 30) minutes before beginning the calibration.

4. Make sure that no reflections, glare or strong, direct light reaches your screen. The room doesn't have to be dark, but ambient light shouldn't interfere with how you see what's on the screen.

5. Print a test photo on a professional quality printer. Choose a daylight photo with a person who has natural skin tone and print it using the highest quality settings and top-quality glossy photo paper. Let it dry away from direct sunlight for a few hours so that the colors can set permanently.

6. Adjust your contrast and brightness controls. They are located either on the front of your monitor or in an on screen menu. Find a calibration test screen online by conducting a search. A free basic calibration tool can be found here.

7. Open the image file that you just printed.

8. Place the printed photo right next to the original image on the screen and compare.

9. Adjust the brightness, contrast, and color levels (red, green, blue) on your monitor until the image on the screen resembles the printed photo as closely as possible. This takes time and a good eye for color. Continue to the next step if you'd like to use software to calibrate your monitor.

10. Use basic software such as Adobe Gamma (if you have Adobe Photoshop 7 or below installed), QuickGamma (which is free), Apple ColorSync, or Monica for Linux to calibrate your monitor. To access Adobe Gamma, click "Start," "Settings" and "Control Panel." For all the software, follow the step by step instructions to perform the calibration. These will provide a basic calibration for, say, casual Photoshop users who don't print a lot of photographs.

11. Purchase specialized software used in conjunction with a colorimeter (a device that reads the actual color values produced by your monitor) if color accuracy is vital to your profession. Some calibration systems worth looking into are ColorVision Spyder 3 Pro, the ColorVision Color Plus (great for home systems), Monaco Systems MonacoOPTIX, and Gretag Macbeth Eye-One Display.

12. Calibrate your monitor every 2 to 4 weeks for optimum visual accuracy."

Source: http://www.wikihow.com/Calibrate-Your-Monitor

Saturday, October 23, 2010

Art Shows for the Christmas Season in the Phoenix Area


17th Annual Carefree Fine Art & Wine Festival


Featuring more than 175 artists, paintings in all mediums, bronzes, photography, pottery, glass wood, mixed media, live musical entertainment, wine & micro-brew tasting, gourmet food and chocolates, $3 entry fee, 10 am - 5 pm

November 5 through November 7

Downtown Carefree, Arizona
Easy & Ho Hum Streets
101 Easy St. Carefree, AZ 85377

Vendor Application: http://www.thunderbirdartists.com/applications.htm
Website:
www.thunderbirdartists.com
Phone: 480-837-5637


Artlink First Fridays

Self-guided art tour of central Phoenix, galleries, art spaces, and studios on the First Friday of each month, free shuttle rides around the downtown area to the different galleries from 6-10 pm. You can pick up a shuttle at the Phoenix Art Museum. At the moment, vendors can only participate through the various galleries, as Roosevelt Row is no longer there.

November 5

Downtown Phoenix

Website: www.artlinkphoenix.com
Phone: 602-256-7539


Believe: A Holiday Boutique & Shopping Extravaganza

Shop from more than 100 vendors, BBQ dinner, specialty coffees and tasty treats. Vendor spaces are sold out, but you can still visit and enjoy! Friday: 5pm-9:30pm and Saturday: 10am-3pm

November 5 through November 6

Chandler - Cornerstone Christian Fellowship
1595 S Alma School Rd
Chandler, AZ 85286

website: www.cschandler.com/boutique


40th Annual Litchfield Park Festival of Arts

More than 250 fine artists and craftsman, confectionery booths, wine tasting, and festival eateries, free entry, 9 am - 5 pm

November 6 through November 7

Litchfield Park - downtown
300 W. Wigwam Blvd
Litchfield Park, AZ

Vendor Application: http://www.vermillionpromotions.com/festivals/40thLitchFestArts.php
Website: www.vermillionpromotions.com
Phone: 623-734-6526


36th Annual Fountain Festival of Arts & Crafts

The Fountain Festival of Arts & Crafts features nearly 500 artists, artisans and gourmet food provisioners. Over 200,000 visitors are attracted to this event to do their holiday shopping, purchase art and enjoy good food and live entertainment.
10 am - 5 pm

November 12 through November 14

Fountain Hills
on the Avenue of the Fountains and Saguaro Blvd by Fountain Park

Website: www.fountainhillschamber.com
Phone: 480-837-1654


Cancer Care Unit Arts & Crafts Fair

Kingman's largest and most popular arts & crafts show, benefits Cancer Care Unit.

November 13 through November 14

Kingman - Mohave County Fairgrounds
2600 Fairgrounds Boulevard
Kingman, AZ 86401

Website: http://allaboutkingman.com/annual-kingman-cancer-care-arts-and-crafts-fair
Phone: 928-757-3760


29th Annual Holiday Craft Market


120+ booths of juried work, including jewelry, metalwork, painting, pottery, ceramics, watercolors, food, free, 10 am - 5 pm


November 19 through November 20

Tucson Museum of Art
140 North Main Avenue
Tucson, AZ 85701

Website: http://www.tucsonmuseumofart.org/
Phone: 520-624-2333


Thunderbird Artists Fine Art & Wine Festival

Featuring more than 100 juried fine artists, fine wine tasting and live musicians, $3, 11 am - 6 pm

November 19 through November 21

Phoenix - CityCenter of CityNorth

website: www.thunderbirdartists.com
phone: 480-837-5637


17th Annual ArtFest of Scottsdale

Featuring more than 200 juried artists & craftspeople from across the nation, continuous live music, international foods, family area featuring hands-on art activities and creative challenges for children, “Book Street” Arizona authors, free, 10 am – 5 pm

November 20 through November 21

Scottsdale Civic Center Plaza
75th St. and Indian School Rd.
7380 E. 2nd Street
Scottsdale, AZ 85251


Website: http://www.888artfest.com/art-shows/arizona/17th-annual-artfest-of-scottsdale
Phone: 480-968-5353 or 888-278-3378


Bell Rock Plaza Art and Craft Show

Meet world renowned native and local artisans and take home a little piece of the magical Red Rock region for your own art collection.

November 20 through November 21

Bell Rock Plaza in Sedona

website: http://www.bellrockartshows.com/
Phone: 928-284-9627


Tempe Festival of the Arts

More than 400 juried artists, both local and national, showcase their works, ranging from woodworking to photography to wearable art. For a fee, guests can enjoy wine tastings from local wineries, courtesy of the Arizona Wine Growers Association.

December 3rd- December 5th

Tempe Mill Avenue District

Vendor Application: http://tempefestivalofthearts.com/artisans
Website: www.tempefestivalofthearts.com
Contact Phone: 602-997-2601


Sixth Annual Mesa Arts Festival

Do your holiday shopping outdoors during this annual festival where original works of art are for sale by local and national artists. Live entertainment on two stages will keep you in good holiday spirits. Kids activities, artist demonstrations and food from local vendors should keep all ages happy.

December 11th through December 12

Mesa Arts Center
1 E. Main St. Mesa, AZ, 85211

Website: www.mesaartscenter.com
Phone: 480-644-6500


40th Annual Fourth Avenue Fall Street Fair

400+ arts & craft booths, food, entertainers & musicians from around the US, 2 stages & street performers, “Van Grow” art area for kids, a cross between a fine art show & a carnival, free, 10 am - 6 pm
December 10 through December 12

Tucson
between Ninth St. and University Blvd

website: www.fourthavenue.org
Phone: 520-624-5004


3rd Annual Carefree Christmas Festival

Real snow in the desert, giant cacti glowing and twinkling in the night and an electric light parade that weaves its way around one of the world's largest sundials are just part of the fun at the weekend-long Annual Carefree Christmas Festival. All Events are Free! 45 art & craft and gift booths, 10-15 food concession booths.

Friday-Saturday: 10am-9pm
Sunday: 10am-5pm

December 10th - 12th

At the Carefree Town Center at Sundial Circle

Vendor Application: http://www.magicbirdfestivals.com/festival_exhibitor_info.html


Fourth Avenue Winter Street Fair

The Fourth Avenue Street Fair brings together 400+ arts and crafts booths, 35+ food vendors, 2 stages, street musicians, food, jugglers, street performers, the Free SPIKE kids hands-on-art Pavilion, face painting, balloons, and tons of other fun activities, then packs them into three days of celebration. 10am - 6pm

December 10th through 12th

Tuscon - fourth Avenue
322 n 4th avenue
tucson, arizona 85705

website: http://www.fourthavenue.org/fairs/general-information/


Attention All Artists: The following street fair is on March 5th, 2011, but if you sign up before December 31st, 2010 with the coupon code "early bird", you will receive 20% off of your premium corner or end-cap booth fee.


Tenth Annual m7 Street Fair

Originally consisting of a few six foot tables, a few dozen classic cars and a few hundred people the m7 Street Fair has grown to over 140 booths, food, rides and crafts for the kids, live music, over 200 classic cars, and almost 18,000 visitors. In ten years this award winning event has become one of the most anticipated events of the year! And this year is no different… Come join us for the the fun!

Saturday, March 5, 2011 from 11am until 5pm


Melrose and 7th ave
Phoenix, AZ

website: http://m7streetfair.com/
vendor application: http://m7streetfair.com/merchant-vendors/products-page/

Friday, August 13, 2010

Photographing Artwork for Professional Photographers

Recommended Equipment:
1) Digital SLR camera capable of manual settings (m) higher than 8mp
2) A good lens, preferably a macro or telephoto. (Both of these lenses help reduce lens distortion.)
2) Tripod
3) Cable Release
4) Gray Card (for metering)
5) Drafting tape, nails, or thumbtacks for hanging artwork onto wall
6) Professional studio lighting with reflective umbrellas (500 watts or more)
7) Adobe CS3, CS4, or CS5 (You will be using Photomerge)

This article focuses on how to reproduce any form of 2-D artwork with professional camera and lighting equipment.

NOTE: This process is unique to Faville Photo and results in a very high resolution file. You will be taking multiple photos of the painting like a panorama and stitching them together with Photomerge in Adobe Photoshop.

Start out by hanging your artwork on the wall. If your artwork is on a paper medium, tape or thumbtack all four corners to the wall to ensure the artwork is completely flat. If your artwork is on stretched canvas, put thumbtacks or nails in the wall for the top stretcher bar to rest on. Make sure your artwork is as level and as flat against the wall as possible. This will reduce the amount of post production work afterwords. Then find a spot to tape your graycard to the wall as well, as close to the painting as possible.

For photographing artwork, I have found that using two 500 watt (or more) light bulbs, each on a light stand and each reflected into an umbrella, is the best setup. One light goes on each side of the artwork (angled towards the artwork), at the same height as the artwork and at 45° to the artwork. The distance depends on the size of the artwork, but start out with around 3 feet from the wall and from each side of the artwork and move the lighting accordingly.


How to set up your lights and your camera:
• Set your camera's ISO to its lowest native setting This will ensure optimal image quality and reduce or eliminate grain. The lowest ISO is usually 100.
• Set your camera's white balance to either cloudy or tungsten. You might have to do a little experimenting to see which white balance works best in your situation.
• Set your aperture to between f/5.6 and f/11 for optimal image quality. This is the range that most lenses obtain the sharpest image.
• Use the light meter on your camera to find the best shutter speed for your lighting situation.

1. Set your camera according to the instructions above.

2. Find a spot to set your camera where just the bottom right corner of the painting is showing in your viewfinder. Try to get as little wall in the frame as possible.

3. Keep your camera settings (f/stop, shutter, iso) the same for all of the photos. This is important!

4. Focus your lens on the painting and take one photo of the corner of the painting. Use your cable release to eliminate camera shake or losing focus.

5. If it is a small painting, move your tripod to the opposite (left, bottom) corner and take a photo. But, make sure that part of the painting is overlapping in both photos. If no part of the painting is overlapping, move your tripod to the bottom middle of the painting. The larger the painting, the more photos you will have to take. (You can also take more photos for higher resolution.)

6. Keep your tripod the same distance away from the painting each time you move it. To help with this, put a piece of tape on the floor or use the lines in your tiles or hardwood floor for guidance (if you have them). Make sure the front two legs of the tripod are on that line at all times.

7. Move the tripod up to the top right corner of the painting and take photo. Then to the left corner. Again, if the painting is larger, you will have to take more pictures. Just go across the painting in rows, up and down, and make sure there is an overlap in the photos. Remember, take a set of photos across the bottom, move your tripod up, and take a set of photos across the top. Make sure there is an overlap in between the top and bottom row. If there is not, you will have to take a row of photos across the middle of the painting as well. Use your best judgment. If you miss part of the painting, or if it does not overlap, photomerge will not be able to stitch it together.
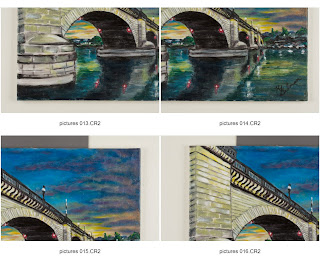


The photo above is my outcome of reproducing a 16x20 canvas print. I took 4 photos of each corner, with enough of the painting overlapping to stitch together effectively in photoshop.

I use a 60mm prime macro lens, which has a 1:1 ratio. These two combined highly reduces any distortion in the images. (The smaller mm, the wider the lens, the more distortion in the photo). Faville Photo also has a rig specifically designed for reproducing artwork. The rig is designed to move the painting, so that the tripod can stay in one spot. This set up allows the lighting to be directed onto one spot, which allows even lighting over the entire painting, even on extremely large pieces. It also reduces the distortion caused by accidentally changing the distance of the tripod in between pictures.

8. Once you have the image files, upload them to your computer. I use Adobe Bridge to view photos. In Adobe Bridge, highlight your photos, then click Tools>Photoshop>Photomerge
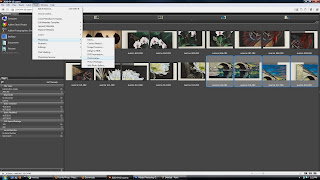

(click photo for larger view)

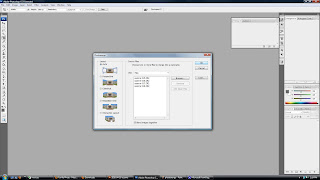
9. These files will open up in Photomerge in Photoshop. You can use the setting "Reposition Only", but I find that "Auto" works better half the time, especially if there is any distortion. Click OK.


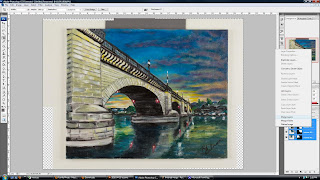
10. Once the photos are stitched together (which can take awhile with a lot of photos), highlight all of the layers, right click on them, then click "Merge Layers".


11. Make sure your rulers are showing. If not, click View>Rulers. Then drag a guidline from the ruler to the highest corner of the top of the painting. Do this for all four sides.
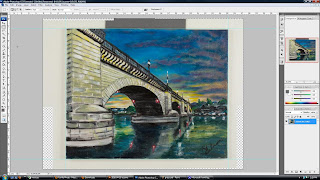


12. Use the Rectangular Marquee Tool to draw a box around the painting, using the guides as a guideline. Then, right click, click on Free Transform. Then, right click again, click on Distort.
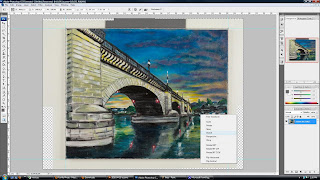


13. Drag the sides and edges of the painting to line up with the guidelines that you created before. This eliminates any distortion.
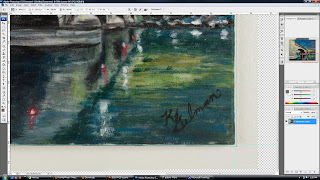


14. Finally, open up the levels adjustments to use the gray card. Image>Adjustments>Levels. Click on the gray dropper between the black and white droppers on the right side, then click on the gray card with the dropper.
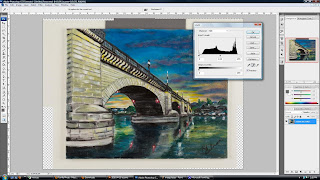


15. Use your guidelines one last time to crop the wall and graycard out of the photo. Having all of these photos stitched together produces a high resolution file of your painting.
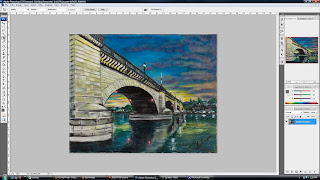


16. If the colors in your image are still off, you can use color balance, Image>Adjustments>Color Balance.

Once you have your final image, you can email it to FavillePhoto@gmail.com for printing onto canvas, photo paper, or any of our other fine art papers. If you would rather have Faville Photo do the reproduction, all color correction and proof prints are included free with the reproduction.

NOTE: If you're looking for a lower quality file portfolios, publication, or internet use, visit this article - Photographing Artwork for Reproduction, Portfolios, or Publication.

www.FavillePhoto.com