Social Icons

twitterfacebookgoogle pluslinkedinrss feedemail

Pages

Saturday, October 23, 2010

Art Shows for the Christmas Season in the Phoenix Area


17th Annual Carefree Fine Art & Wine Festival


Featuring more than 175 artists, paintings in all mediums, bronzes, photography, pottery, glass wood, mixed media, live musical entertainment, wine & micro-brew tasting, gourmet food and chocolates, $3 entry fee, 10 am - 5 pm

November 5 through November 7

Downtown Carefree, Arizona
Easy & Ho Hum Streets
101 Easy St. Carefree, AZ 85377

Vendor Application: http://www.thunderbirdartists.com/applications.htm
Website:
www.thunderbirdartists.com
Phone: 480-837-5637


Artlink First Fridays

Self-guided art tour of central Phoenix, galleries, art spaces, and studios on the First Friday of each month, free shuttle rides around the downtown area to the different galleries from 6-10 pm. You can pick up a shuttle at the Phoenix Art Museum. At the moment, vendors can only participate through the various galleries, as Roosevelt Row is no longer there.

November 5

Downtown Phoenix

Website: www.artlinkphoenix.com
Phone: 602-256-7539


Believe: A Holiday Boutique & Shopping Extravaganza

Shop from more than 100 vendors, BBQ dinner, specialty coffees and tasty treats. Vendor spaces are sold out, but you can still visit and enjoy! Friday: 5pm-9:30pm and Saturday: 10am-3pm

November 5 through November 6

Chandler - Cornerstone Christian Fellowship
1595 S Alma School Rd
Chandler, AZ 85286

website: www.cschandler.com/boutique


40th Annual Litchfield Park Festival of Arts

More than 250 fine artists and craftsman, confectionery booths, wine tasting, and festival eateries, free entry, 9 am - 5 pm

November 6 through November 7

Litchfield Park - downtown
300 W. Wigwam Blvd
Litchfield Park, AZ

Vendor Application: http://www.vermillionpromotions.com/festivals/40thLitchFestArts.php
Website: www.vermillionpromotions.com
Phone: 623-734-6526


36th Annual Fountain Festival of Arts & Crafts

The Fountain Festival of Arts & Crafts features nearly 500 artists, artisans and gourmet food provisioners. Over 200,000 visitors are attracted to this event to do their holiday shopping, purchase art and enjoy good food and live entertainment.
10 am - 5 pm

November 12 through November 14

Fountain Hills
on the Avenue of the Fountains and Saguaro Blvd by Fountain Park

Website: www.fountainhillschamber.com
Phone: 480-837-1654


Cancer Care Unit Arts & Crafts Fair

Kingman's largest and most popular arts & crafts show, benefits Cancer Care Unit.

November 13 through November 14

Kingman - Mohave County Fairgrounds
2600 Fairgrounds Boulevard
Kingman, AZ 86401

Website: http://allaboutkingman.com/annual-kingman-cancer-care-arts-and-crafts-fair
Phone: 928-757-3760


29th Annual Holiday Craft Market


120+ booths of juried work, including jewelry, metalwork, painting, pottery, ceramics, watercolors, food, free, 10 am - 5 pm


November 19 through November 20

Tucson Museum of Art
140 North Main Avenue
Tucson, AZ 85701

Website: http://www.tucsonmuseumofart.org/
Phone: 520-624-2333


Thunderbird Artists Fine Art & Wine Festival

Featuring more than 100 juried fine artists, fine wine tasting and live musicians, $3, 11 am - 6 pm

November 19 through November 21

Phoenix - CityCenter of CityNorth

website: www.thunderbirdartists.com
phone: 480-837-5637


17th Annual ArtFest of Scottsdale

Featuring more than 200 juried artists & craftspeople from across the nation, continuous live music, international foods, family area featuring hands-on art activities and creative challenges for children, “Book Street” Arizona authors, free, 10 am – 5 pm

November 20 through November 21

Scottsdale Civic Center Plaza
75th St. and Indian School Rd.
7380 E. 2nd Street
Scottsdale, AZ 85251


Website: http://www.888artfest.com/art-shows/arizona/17th-annual-artfest-of-scottsdale
Phone: 480-968-5353 or 888-278-3378


Bell Rock Plaza Art and Craft Show

Meet world renowned native and local artisans and take home a little piece of the magical Red Rock region for your own art collection.

November 20 through November 21

Bell Rock Plaza in Sedona

website: http://www.bellrockartshows.com/
Phone: 928-284-9627


Tempe Festival of the Arts

More than 400 juried artists, both local and national, showcase their works, ranging from woodworking to photography to wearable art. For a fee, guests can enjoy wine tastings from local wineries, courtesy of the Arizona Wine Growers Association.

December 3rd- December 5th

Tempe Mill Avenue District

Vendor Application: http://tempefestivalofthearts.com/artisans
Website: www.tempefestivalofthearts.com
Contact Phone: 602-997-2601


Sixth Annual Mesa Arts Festival

Do your holiday shopping outdoors during this annual festival where original works of art are for sale by local and national artists. Live entertainment on two stages will keep you in good holiday spirits. Kids activities, artist demonstrations and food from local vendors should keep all ages happy.

December 11th through December 12

Mesa Arts Center
1 E. Main St. Mesa, AZ, 85211

Website: www.mesaartscenter.com
Phone: 480-644-6500


40th Annual Fourth Avenue Fall Street Fair

400+ arts & craft booths, food, entertainers & musicians from around the US, 2 stages & street performers, “Van Grow” art area for kids, a cross between a fine art show & a carnival, free, 10 am - 6 pm
December 10 through December 12

Tucson
between Ninth St. and University Blvd

website: www.fourthavenue.org
Phone: 520-624-5004


3rd Annual Carefree Christmas Festival

Real snow in the desert, giant cacti glowing and twinkling in the night and an electric light parade that weaves its way around one of the world's largest sundials are just part of the fun at the weekend-long Annual Carefree Christmas Festival. All Events are Free! 45 art & craft and gift booths, 10-15 food concession booths.

Friday-Saturday: 10am-9pm
Sunday: 10am-5pm

December 10th - 12th

At the Carefree Town Center at Sundial Circle

Vendor Application: http://www.magicbirdfestivals.com/festival_exhibitor_info.html


Fourth Avenue Winter Street Fair

The Fourth Avenue Street Fair brings together 400+ arts and crafts booths, 35+ food vendors, 2 stages, street musicians, food, jugglers, street performers, the Free SPIKE kids hands-on-art Pavilion, face painting, balloons, and tons of other fun activities, then packs them into three days of celebration. 10am - 6pm

December 10th through 12th

Tuscon - fourth Avenue
322 n 4th avenue
tucson, arizona 85705

website: http://www.fourthavenue.org/fairs/general-information/


Attention All Artists: The following street fair is on March 5th, 2011, but if you sign up before December 31st, 2010 with the coupon code "early bird", you will receive 20% off of your premium corner or end-cap booth fee.


Tenth Annual m7 Street Fair

Originally consisting of a few six foot tables, a few dozen classic cars and a few hundred people the m7 Street Fair has grown to over 140 booths, food, rides and crafts for the kids, live music, over 200 classic cars, and almost 18,000 visitors. In ten years this award winning event has become one of the most anticipated events of the year! And this year is no different… Come join us for the the fun!

Saturday, March 5, 2011 from 11am until 5pm


Melrose and 7th ave
Phoenix, AZ

website: http://m7streetfair.com/
vendor application: http://m7streetfair.com/merchant-vendors/products-page/

Friday, August 13, 2010

Photographing Artwork for Professional Photographers

Recommended Equipment:
1) Digital SLR camera capable of manual settings (m) higher than 8mp
2) A good lens, preferably a macro or telephoto. (Both of these lenses help reduce lens distortion.)
2) Tripod
3) Cable Release
4) Gray Card (for metering)
5) Drafting tape, nails, or thumbtacks for hanging artwork onto wall
6) Professional studio lighting with reflective umbrellas (500 watts or more)
7) Adobe CS3, CS4, or CS5 (You will be using Photomerge)

This article focuses on how to reproduce any form of 2-D artwork with professional camera and lighting equipment.

NOTE: This process is unique to Faville Photo and results in a very high resolution file. You will be taking multiple photos of the painting like a panorama and stitching them together with Photomerge in Adobe Photoshop.

Start out by hanging your artwork on the wall. If your artwork is on a paper medium, tape or thumbtack all four corners to the wall to ensure the artwork is completely flat. If your artwork is on stretched canvas, put thumbtacks or nails in the wall for the top stretcher bar to rest on. Make sure your artwork is as level and as flat against the wall as possible. This will reduce the amount of post production work afterwords. Then find a spot to tape your graycard to the wall as well, as close to the painting as possible.

For photographing artwork, I have found that using two 500 watt (or more) light bulbs, each on a light stand and each reflected into an umbrella, is the best setup. One light goes on each side of the artwork (angled towards the artwork), at the same height as the artwork and at 45° to the artwork. The distance depends on the size of the artwork, but start out with around 3 feet from the wall and from each side of the artwork and move the lighting accordingly.


How to set up your lights and your camera:
• Set your camera's ISO to its lowest native setting This will ensure optimal image quality and reduce or eliminate grain. The lowest ISO is usually 100.
• Set your camera's white balance to either cloudy or tungsten. You might have to do a little experimenting to see which white balance works best in your situation.
• Set your aperture to between f/5.6 and f/11 for optimal image quality. This is the range that most lenses obtain the sharpest image.
• Use the light meter on your camera to find the best shutter speed for your lighting situation.

1. Set your camera according to the instructions above.

2. Find a spot to set your camera where just the bottom right corner of the painting is showing in your viewfinder. Try to get as little wall in the frame as possible.

3. Keep your camera settings (f/stop, shutter, iso) the same for all of the photos. This is important!

4. Focus your lens on the painting and take one photo of the corner of the painting. Use your cable release to eliminate camera shake or losing focus.

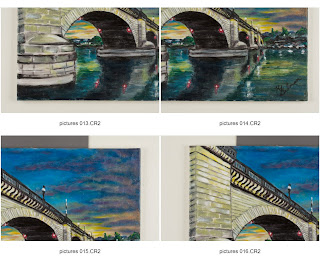
5. If it is a small painting, move your tripod to the opposite (left, bottom) corner and take a photo. But, make sure that part of the painting is overlapping in both photos. If no part of the painting is overlapping, move your tripod to the bottom middle of the painting. The larger the painting, the more photos you will have to take. (You can also take more photos for higher resolution.)

6. Keep your tripod the same distance away from the painting each time you move it. To help with this, put a piece of tape on the floor or use the lines in your tiles or hardwood floor for guidance (if you have them). Make sure the front two legs of the tripod are on that line at all times.

7. Move the tripod up to the top right corner of the painting and take photo. Then to the left corner. Again, if the painting is larger, you will have to take more pictures. Just go across the painting in rows, up and down, and make sure there is an overlap in the photos. Remember, take a set of photos across the bottom, move your tripod up, and take a set of photos across the top. Make sure there is an overlap in between the top and bottom row. If there is not, you will have to take a row of photos across the middle of the painting as well. Use your best judgment. If you miss part of the painting, or if it does not overlap, photomerge will not be able to stitch it together.


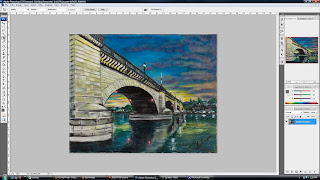
The photo above is my outcome of reproducing a 16x20 canvas print. I took 4 photos of each corner, with enough of the painting overlapping to stitch together effectively in photoshop.

I use a 60mm prime macro lens, which has a 1:1 ratio. These two combined highly reduces any distortion in the images. (The smaller mm, the wider the lens, the more distortion in the photo). Faville Photo also has a rig specifically designed for reproducing artwork. The rig is designed to move the painting, so that the tripod can stay in one spot. This set up allows the lighting to be directed onto one spot, which allows even lighting over the entire painting, even on extremely large pieces. It also reduces the distortion caused by accidentally changing the distance of the tripod in between pictures.

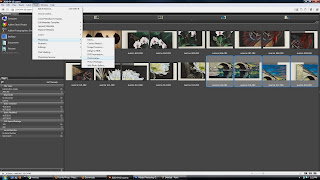
8. Once you have the image files, upload them to your computer. I use Adobe Bridge to view photos. In Adobe Bridge, highlight your photos, then click Tools>Photoshop>Photomerge


(click photo for larger view)

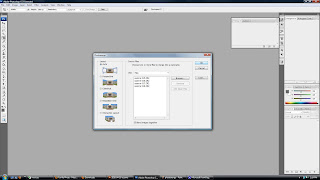
9. These files will open up in Photomerge in Photoshop. You can use the setting "Reposition Only", but I find that "Auto" works better half the time, especially if there is any distortion. Click OK.


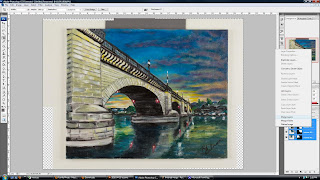
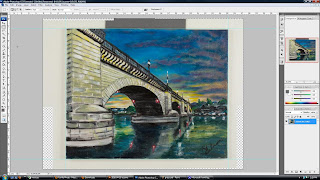
10. Once the photos are stitched together (which can take awhile with a lot of photos), highlight all of the layers, right click on them, then click "Merge Layers".


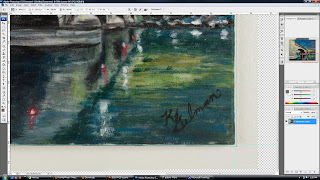
11. Make sure your rulers are showing. If not, click View>Rulers. Then drag a guidline from the ruler to the highest corner of the top of the painting. Do this for all four sides.


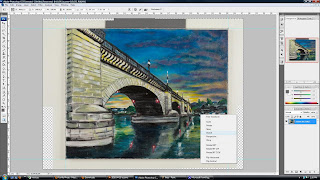
12. Use the Rectangular Marquee Tool to draw a box around the painting, using the guides as a guideline. Then, right click, click on Free Transform. Then, right click again, click on Distort.


13. Drag the sides and edges of the painting to line up with the guidelines that you created before. This eliminates any distortion.


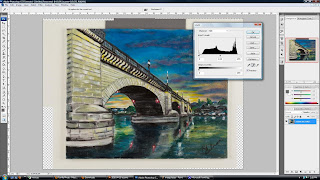
14. Finally, open up the levels adjustments to use the gray card. Image>Adjustments>Levels. Click on the gray dropper between the black and white droppers on the right side, then click on the gray card with the dropper.


15. Use your guidelines one last time to crop the wall and graycard out of the photo. Having all of these photos stitched together produces a high resolution file of your painting.


16. If the colors in your image are still off, you can use color balance, Image>Adjustments>Color Balance.

Once you have your final image, you can email it to FavillePhoto@gmail.com for printing onto canvas, photo paper, or any of our other fine art papers. If you would rather have Faville Photo do the reproduction, all color correction and proof prints are included free with the reproduction.

NOTE: If you're looking for a lower quality file portfolios, publication, or internet use, visit this article - Photographing Artwork for Reproduction, Portfolios, or Publication.

www.FavillePhoto.com

Tuesday, May 4, 2010

Popular Art Shows to display at in Phoenix, Arizona

Part of our business here at Faville Photo is helping start-up Artists and Photographers figure out how to locate, get ready for, and display at art shows or festivals around the state or country.

First, you have to locate the right venue. There are a couple of places to start with when trying to find some good affordable art shows here in the valley. (For those of you not in the Phoenix area, the best place to start looking is Festivalnet.com. Just type in your state or zip code for a list of events in your area.) Although, there are plenty of art shows to attend here in the valley, we are going to give you 3 places that we recommend.

#1 is the only art event that we personally display at: First Friday's on Roosevelt Row in Downtown phoenix. This is a pretty large monthly event on Roosevelt Row between Central and 7th St. They usually have over 200 vendors a month, and see traffic in the neighborhood of 10,000 people per show. The show is on the First Friday of every month. If you go to the website I listed above, you can find contact information and information about registering to participate in the event. It's only $50.00 per booth for the night, which is very reasonable considering the amount of potential customers that come through in a night. For the price, it's our opinion that this is the best local art show in the Valley. There are other shows in the area, like the Tempe Art Show on Mill, and the Fountain Hills Art Festival that probably rank higher than First Friday, but they only run Annually, or Semi-Annually, and are much more costly to get involved in - i.e. Hundreds of dollars per booth. If you're serious about displaying your art, check out Roosevelt Row. It's a great place to start.

#2 is a local group called Artisan Markets AZ. Audrey Thacker founded and runs this organization. She's a great person to know, and the group helps artists, photographers, graphic designers, jewelry and fashion designers, etc. find a wide variety of shows and events to display their work at. This group usually has at least one recommended show per week that you have the opportunity to get involved with. On average, a booth fee at one of their shows is about $20.00. It's a very affordable way to find great shows and events around the valley. Check out the website, read more about them, and feel free to contact them if you have any questions about getting involved in any art shows or events. Be sure to let them know Faville Photo sent you, and they'll take great care of you.

#3 is the East Valley Art Guild. This is another group of like-minded artists, photographers, designers, etc. that get together on a monthly basis to talk about and promote their work. They also have a gallery in Mesa, that members can display their work in. There are a number of Art Guilds in the Valley. This just so happens to be one that Faville Photo is a part of and works closely with, since we're located in the East Valley. Feel free to check them our, or visit the gallery for more information on joining the guild. The dues are very reasonable, and you gain access to a lot of great events and a gallery to display your work.

We hope to have provided you with at least a couple of places to check out in regards to finding the right venue to display your work at. The next step in the process, once you know how to find a show and get involved in a show, is to prepare for the show. Click this link to find out how.

Saturday, April 17, 2010

Photographing Artwork for Reproductions, Portfolios, or Publication*

*This article was written for those using a non professional point and shoot camera. If you have access to a professional SLR camera and professional photo equipment, visit our entry on "Photographing Artwork For Professional Photographers".

Necessary Equipment:
1) Digital camera (preferably higher than 8 megapixels)
2) Tripod
3) Drafting tape (not masking tape) for taping art to flat surface

Recommended Equipment:
1) Digital Camera capable of Manual (m) settings higher than 8 megapixels
2) Cable Release
3) Gray Card (for metering)

There are many different sources of light that the average person has access to, but in the absence of a professional studio, we recommend photographing outside in the natural light for the most accurate colors. You have one of two options for photographing in the daylight:

1. Bright Sunlight
- Produces accurate color
- Enables texture of medium to be visible

2. Open Shade
- Color shifts towards blue, but the image can be adjusted in Photoshop or
sometimes by using the cloudy or shade white balance on your camera
- Produces soft flat illumination
- Reduces texture of medium

Before you decide which light source is best for you, let's go over some basic rules:

1) Do not photograph in direct sunlight, this will wash out the image. The best time to photograph your artwork is in the early afternoon when the sun is overhead.
2) Make sure your camera is set to the highest resolution or largest photo size possible. Check your camera manual for more information on how to do this. (All cameras are different)
3) Do not zoom. Move your camera closer by moving the tripod closer. The zoom feature on a point and shoot camera is just a crop of the full size photo and can cause a loss in quality. Although zooming can reduce distortion with the edges of the artwork swelling up, this can be easily fixed in photoshop, whereas loss of quality can not.
4) If possible, remove artwork from any framing behind glass to eliminate glare and reflections.
5) Artwork must be as flat as possible to ensure the reproduction will not be distorted.
6) Never use a direct flash! You will not need to use your flash when photographing outdoors, so be sure to turn it off.

Now that you've decided which light source is best for your artwork, let's get started:

Take your painting outside on a sunny day. The natural outdoor light is MUCH better than anything indoors.

Find a place where you can hang your artwork directly onto the wall. If your artwork is on a paper medium, tape or thumbtack all four corners to the wall to ensure the artwork is completely flat. If your artwork is on stretched canvas, put thumbtacks or nails in the wall for the top stretcher bar to rest on. If you were unable to find a wall to hang on, lean the painting against a wall so that it stands almost perfectly upright.

Make sure the light is even on all parts of the painting. If there is shade or shadow along with direct sunlight on any part of the painting, find a different spot.

We would suggest using a tripod with your digital camera to make sure you're taking perfectly steady shots. No tripod? Find something tall and sturdy to let your camera rest on.

Make sure your camera is straight and level with the painting. If the painting is not hung up and is leaning against a wall, tilt your camera slightly downward to match the angle that the artwork is leaning. This will help minimize distortion of the image.

Be sure to fill the viewfinder of the camera as much as possible and then check to see that all the edges of your work are parallel with the edges of the viewfinder. Distortion will occur if the camera is not dead center to the artwork.

Take several pictures because it won’t always be as easy to tell on the viewfinder whether or not there’s any distortion or anything is out of focus. Once your images are up on your computer, you’ll be able to see for sure which photo is best.

If you're using the manual (m) setting on your camera, here are some tips:
1. Use an 18% gray card to meter, if possible
2. Set the white balance for "Daylight"
3. Use a small aperture for greatest depth of field to ensure art will be in focus, ex f22
4. Use a small iso, preferably 100iso, to eliminate or reduce grain
5. Use a cable release or self timer to make the exposure

Once you have the digital file of your artwork, you can send it to us at FavillePhoto@gmail.com for correction (free with the purchase of prints) or refer to the second half of the article "Photographing Artwork for Professional Photographers."

If you'd rather have it shot in a professional studio setting, visit our artwork reproduction page.

Tuesday, April 13, 2010

How to Prepare for Your First Art Show

Some art shows are different than others, in regards to whether they offer power or not, offer tables and chairs or not, etc. But, in general, you will have to pretty much provide your entire set-up. Follow some of the tips below to help get you started on preparing for an art show.

#1.) Obviously, before anything else, you need products to sell. Visit Faville Photo's Giclee Printing Site to learn more about our giclee printing products. Please feel free at any time, to contact us via e-mail at FavillePhoto@Gmail.com or call us at (623) 204-7516. We're always here to answer questions, give advice or recommendations about our different printing products, or help you figure out the best way to prepare for your up-coming show. We're easy to work with, fast, affordable, reliable, and professional. We look forward to hearing from you and helping with your event!

#2.) Now that you have your prints, let's talk about your setup. With the exception of a couple of shows, pop-up tents are not mandatory for display, but HIGHLY recommended, especially during the hotter months (which in Arizona seems like that's 11 of the 12 months in the year). Tents also look much more professional. You can find great pop-up tents for less than $100.00 at both Wal-Mart and Target.

#3.) After the tent, the exact setup depends on what kind of art you're displaying, but since Faville Photo is a Giclee Print Shop, and specializes in photo printing and stretched canvas printing, let's assume you're going to be displaying some of the products that we probably created for you. The best way to display stretched canvas pieces is on a wall. We recommend visiting your local home improvement store like Home Depot and picking up either Pegboard Wall or Garden Lattice Wall. The Lattice wall is a little cheaper and lighter (easier to transport), but the Pegboard wall is more sturdy and, in our opinion, more customizable. Either way, you'll enclose your tent with a couple sheets of the wall of your choice. We recommend getting cable zip ties from the same home improvement store to mount the wall pieces to your tent. These are strong, easy to work with, and easy to remove at the end of the night.

#4.) With the wall in place, you'll need a way to display your work on the wall. If you decided to go with pegboard, be sure to also get pegboard hooks. These will mount right to the pegboard and you can set your art on top of them. If you chose the Lattice wall, you'll want to get S-hooks, and hang your art on the wall with those hooks.

#5.) Now that you have your tent and walls in place, you'll want to get a table so you can lay out all of your information. You can get a nice looking and easy to transport fold up table for $50 dollars at Wal-Mart or Target, along with the tent. Always take business cards, fliers, brochures, etc. At a lot of of these art shows, you are trying to immediately sell your work, but you're also trying to build a fan base, or take commission work. And, in some cases, people just don't bring the cash with them, but they're honestly interested in your work. Give them some information so they can get back in touch with you later.

#6.) The table is also a great place to display some of your smaller products. We always recommend creating your work in large options as well as smaller options. If someone absolutely loves one of your pieces, but can't afford $300.00 on a large canvas print, there's no reason why they shouldn't leave your booth having purchased a $30.00 matted print of it instead. Get a matted print rack from Jerry's Artarama, or any other local Art Supply Store, so you can display all of your smaller print options in one of those. They make it easy to transport, and easy to display. Another great option for a smaller product is our mini canvas' (each one comes with a mini easel as well).

Displaying at an art show is easy as that. There are always exceptions to the rule. Some shows, like First Friday's are at night, so you have to deal with lighting issues, and electrical issues to power your lights. Night shows, or shows that don't provide electricity are rare, so we're not going to cover that here. If your art show is different, or you are displaying different kinds of products, or you just have a question about something we didn't cover in this article, please feel free to contact us at any time. You can reach us 7 days a week, 8am to 10pm at (623) 204-7516, or you can e-mail us 24 hours a day, 7 days a week at FavillePhoto@Gmail.com

Saturday, April 10, 2010

The Importance of Reproducing Original Artwork as Limited Edition Prints

In today’s economy, the market for original artwork has diminished considerably. Once potential buyers are now concerned about keeping their jobs and making the mortgage payment on time. Connoisseurs who used to purchase $1000.00 paintings without even flinching are thinking twice about paintings half that price. This is a serious problem for professional artists who live off of the sales of their paintings. These artists don’t have full-time jobs to fall back on. Art is their job - art is their life, and their lives are being threatened by the faltering economy we face.
There is a solution to this problem, however, that some artists will take advantage of now, and it will carry them through the current tough times, as well as increase their market share in the future when the serious buyers return. The solution: Original Artwork Reproduction. There are a number of places that can take an original painting, drawing, or pastel and scan it or digitally photograph it to create a high resolution digital copy of the work. Prices for this service vary from shop to shop. On the low end of the spectrum, you can find places that will reproduce original art for $50.00 to $75.00 per piece. On the high end, some places charge as much as $200.00 or $300.00 per piece. Do some research and find the place that suits your needs, both in quality, and in budget.
Once a digital copy of the artwork has been created, a whole new world of opportunities opens up to the artist. Instead of selling the original painting for a one-time price of $1000.00, an artist can now reproduce limited edition prints of the piece over and over again. The cost of production is drastically reduced, so in turn, the price can be reduced as well. A lower price means that more people will consider purchasing the piece, because it will now fall within their tightened budget. There is no limit to how many prints an artist can choose to sell, so the potential profit is much greater per painting, when selling prints versus the original. Don’t forget – the original is still available for purchase for the still-wealthy connoisseur. Another advantage of reproduction is the wide variety of options that are available to the artist. Offer small photo prints, matted prints, postcards, and more. The goal, in this economy, is to offer a wide variety of products in different price ranges that can appeal to anyone; Rich or poor; there is something that everyone can afford to take away.
Lastly, this is not just a temporary solution to weather the current economic storm. This is a permanent opportunity to increase profitability and share your work with a larger group of people. When the economy stabilizes, there will still be plenty of people living on a tight budget. These people deserve to enjoy fine-art too. Continue to offer products in low price ranges so that anyone can afford something. You will gain a lot of exposure, and you’ll be sharing your gift with many people who normally wouldn’t be able to enjoy your beautiful work.

For more information on Original Artwork Reproduction, you can contact John Gilman with Faville Photo. Faville Photo specializes in artwork reproduction and large format giclee printing.

Call: (623) 204-7516
Email: FavillePhoto@Gmail.com
Web: www.FavillePhoto.com

Wednesday, April 7, 2010

Faville Photo's First Blog!

Faville Photo is a small locally owned and operated giclee print shop in Mesa, AZ.

We originally started this business so we could reproduce Jessica's digital photography onto canvas, photo paper, or other fine art media. We had a really hard time finding helpful or affordable places locally that could do the kind of printing work we wanted, and eventually just decided doing it ourselves would be the best option. We invested in all of the equipment and materials necessary to get started and were successfully printing Jessica's photography onto stretched canvas and they looked fantastic. Faville Photo was born!

After a few months of focusing on Jessica's photography, getting out to art shows and speaking with other local artists, we realized that alot of other local artists were also having a hard time finding affordable printers to do their work. Many of them were ordering prints from out-of-state, waiting 6 weeks for them to arrive, and paying massive shipping costs. We were shocked to hear this! It was at this moment that we decided to become the first local giclee print shop that is affordable, reliable, fast, and most importantly offers great customer service. We had been through the troubles of finding printing options before, so we understood exactly what these other artists were going through, and we wanted to be their solution.

Faville Photo now boasts a very large customer base comprised of both artists and photographers, as well many regular local customers that need a reliable custom printer.

We offer 10 different types of printing media, in sizes ranging from extremely small like 2"x3" all the way to extremely large like 40"x72". Not only can we handle ANY custom, large format or regular format printing project you have, we do it affordably and in an extremely timely manner - often taking only 1 day for most photo prints or fine art prints, and only 2 to 3 days for stretched canvas prints. On top of everything, you get our top-of-the-line customer service - 1-on-1 personal service, 7 days a week, 16 hours a day. We're always here and available to answer questions, give ideas and recommendations, and take care of anything you might need.

Visit www.FavillePhoto.com to check us out!

Now that you know who we are and what we do, let's get to the point of this blog. From time to time, we are going to be posting important articles, how-to's, and information about all of the services we provide, which include: digital photography, artwork reproduction, product shoots, giclee printing, custom framing, custom matting, canvas stretching, graphic design and much more!

Check back soon for our first article: "The Importance of Reproducing Original Artwork as Limited Edition Prints"